Wednesday, March 28, 2012

Peanut Butter Chocolate Chip Cupcakes

Okay, so I know that Summer is coming up and everyone wants to look perfect and is working out and eating healthy but I mean, you have to make an exception for these cupcakes! They're pure heavvvvveenn :D 

Peanut Butter Chocolate Chip Cupcakes
They have a base (the cupcake) and a top (the icing) and everything about them is perfect. Swear

The recipe for these buggers goes like this: 
If you can't see that cute little picture, I'll type it out for ya!
Peanut Butter Chocolate Chip Cupcakes
     1 cup unbleached all purpose flour
     1 tsp baking powder
     1/4 tsp salt
     6 tbsp unsalted butter, at room temperature
     3/4 cup smooth all natural peanut butter, at room temperature
     1/2 cup packed dark brown sugar
     1/2 cup sugar
     2 large eggs
     1 tsp vanilla extract
     1/2 cup whole milk
     2 cups semi-sweet chocolate chips
Peanut Butter Frosting
     6 ounces unsalted butter, room temperature
     1/2 cup confectioners' sugar
     1/2 tsp salt
     1 cup creamy peanut butter, natural (or if you want a smoother look, go not-natural)
     1/2 tsp pure vanilla extract
     1/2 cup whole milk
Better?? :)
And here is what perfection looks like ladies and gentleman.. Drumroll please....


For these things you have to love peanut butter, and I mean, who doesn't? Come'on! 
Basically, this is a super moist peanut butter cake filled with chocolate chips
and an amazing fluffy frosting!

So.. lets begin!

Step one: Preheat the oven to 350 degrees F

Step two: Combine the milk and the vanilla from the cake recipe in a small bowl 

Step three: In another small bowl (I know there are a lot of them. Trust me it's worth it) combine all the baking powder, flour, and salt

Step four: Take out your mixer, if you have one. If you don't you can use a big
bowl and break out the whisk for
a hellava arm workout. 
Beat the butter and sugar until light and fluffy and perfect

Step five: (5,5,5) Add the eggs to your buttery sugar mixture and beat until 
smooth and creamy

Step seis (that's six for you nonspanish speaking people out there): Slowly mix in the peanut butter (YUMM) and add half of the flour mixture from 
your small bowl into the mixture

Step seven: Now, you know that milk mixture that you made in that cute little small bowl??
Now add that to the big mixture too! 

Step eight: Now when that's all smooth and creamy add the remaining flour mixture and 
DA DA DA DAAAAA, add the chocolate chips!

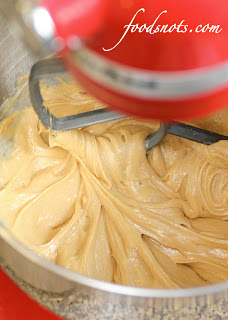
It should look something like this now

Step nine: Now evenly distribute the mixture into 12 lined baking cups

Step 10: Finally, bake these cute little cakes of goodness in the preheated oven for
about 22 minutes or until the tops spring back when lightly
touched and the sides are
a pretty golden brown. 


Now it's time for the best part ever! The FROSTING!! Don't judge me, I get excited about things like this :)

Step one: Take out two little bowls, I know here we are going with the 
bowls again but it will be worth all the dirty dishes
in the end, trust me
In one bowl combine the sugar and salt
In the other bowl combine the milk and vanilla

Step two: Take out your mixer or plain whisk again
and in a big bowl combine the butter and peanut butter
Mmmmmmm buttery! :D
And beat that until its all smooth and creamy


Step three: Now add the sugar and milk mixture in
small quantities until it's all in there!


Step four: Add additional milk ONLY if needed for a softer consistency. You can also add additional powdered sugar if you need to make your frosting thicker.


Step five: Your frosting should look something like this now..

Step six, six, six :) (I felt like repeating the number, don't ask me why): Now your frosting is done!! Make sure your cupcakes have cooled down and 
frost them! Don't do light on the frosting.

Heres the final cupcake! HOW BEAUTIFUL, I can hear
the angels singing from the heavens :D

Wednesday, March 21, 2012

Pumpkin Angel Food Cake!! Yummmmm

Does that not look delicious!? ^^ YESYESYESYESYES
This is perfect for fall, but really any time of the year would work for this cute little treat....

Soooo... what do you need?

1 box Betty Crocker white angel food cake mix
1 tbsp. Gold Medal all-purpose flour
1 tsp. cinnamon
¼ tsp. ginger
1/8 tsp. nutmeg
1/8 tsp. cloves
¾ cup canned pumpkin (not pumpkin pie filling)
1 cup cold water

All the ingredients will look like this once you get them together :D

So first your going to have to heat your oven to 350 degrees F and move the oven rack to 
the lowest position.

Step dos!(2): Beat all the ingredients with an electric mixer on low speed for
about 30 seconds

Step number three: Noooooooww, beat on medium speed for about one minute.
See how easy that was?!

Step 4: Now just pour it straight into an ungreased 10in angel food
cake pan and bake for 37-47 minutes until crust is
golden brown and cracks are dry

Step 5: Now IMMEDIATELY flip it over onto a glass pan and wait for two hours then gently shake it out.
It should come out smoothly

Nooooooow time for the glaze... (Best part btw ;) )

Salted Caramel Glaze (Grinandbakeit.com)
¼ cup butter, unsalted
¼ cup dark brown sugar
¼ cup granulated sugar
½ cup whipping cream
¼  tsp. sea salt
2tsp. cinnamon


Step uno: Melt 1/4 cup butter over medium heat in a biiiiiiiig saucepan.

Step 2: Stir in ALLLLLL the suger! :D

Step 3: Bring it all to a boil and make sure to stir it A LOT.


Step 4: Add the whipping cream & let it boil for 2 minutes.


DON'T FORGET TO STIR! (:


Step 5: Remove it from the heat and now you can add
all the other ingredients
Salt.
Cinnamon. 

It'll all make about 1 cup of glaze

Let it cool for about 2 minutes & then pour it right over your cake.

YUMMMMMMMMM!

Now 


Wednesday, March 14, 2012

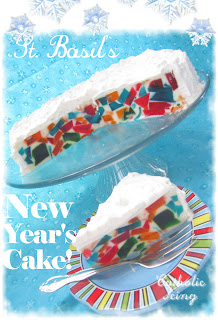
Jewel Cake!!!

** Recipe from www.catholicicing.com **


Have you ever wanted your friends to cut into a cake and say, "Oh my gosh that is the coolest thing ever!!", or "How in the world did you do that?! You have to show me!!" 


If you answered yes to that then this cake is PERFECT FOR YOU! It's called a Jewel Cake!

To make this cake, here’s what you’ll need:
  • 4 packages of jell-o (3 oz each) in different colors
  • 1 can of sweetened condensed milk
  • 2 envelopes of unflavored (Knox) gelatin
To make the whipped frosting, here’s what you’ll need:
  • 1 cup heavy cream
  • 1/2 teaspoon unflavored (Knox) gelatin
  • 4 tablespoons powdered sugar
  • 1/2 teaspoon vanilla
Step 1: So to make the jewels you need to use the 4 packages of jello and with each package,
use separate bowls. In each of these bowls mix one package of 
jello and 1 cup of hot water
Let cool.
After they cool cut the jello into pretty equal sized squares and mix in a big bowl. 
Everything should look like this now :)

Now, in a big bowl mix the 2 envelopes of gelatin with 2 cups of hot water and stir until EVERYTHING dissolves and then add the can of sweetened condensed milk. 
Now arrange the Jello "Jewels" in a pan.
Then pour the white mixture into the pan and make sure it covers all of your jewels! 
:D

Your pan should look like this now. Oh and by the way, we're on step 3
Step three! Just put the pan/dish in the fridge and let sit
You have to let it sit for at least three hours or it won't work! 
Step four: After you've let it sit for 3 hours, the jello should easily come out of the pan when you flip is upside down.
It will be a little wobbly, don't worry about that, it's Jello!
It's not going to collapse or anything.
Step four: Now it's time to make the yummmmmmmmmmmmmmmy whipped frosting! 
If your too lazy and don't have much time cool whip will work just fine 
but if you want to be original.....
Put 1/2 tsp of Knox gelatin in a coffee mug with 1 tablespoon of cold water and let it soften for several minutes. Heat up 2 cups of hot water in a small sauce pan, and then hold the bottom of the mug in the hot water to dissolve the gelatin. Once dissolved, allow to cool to room temperature.  While it’s cooling, whip your heavy cream into whipped cream. Add the gelatin mixture at the same time as your powdered sugar, and vanilla. Frost your cake immediately, and then chill.


So now you should have a COMPLETELY iced cake and when your guests cut it open, they are BOUND for a huge shocker. 

Drumroll pleaseeeeeeeeeeeeeeeeeeeeeeee.....


I included a video of how to make Jello for any of you that are confused... be sure to check it out! 


Wednesday, February 29, 2012

Embroidered Card!

Ever heard or sewing a card? No, well it's pretty great! I found this amazing DIY on http://blog.fossil.com...Wanna see what it looks like?

How cool is that?!

Alrighty so the materials are pretty simple:

Materials:
Cardstock (or any thick paper you want to put your design on)
Graph Paper
Tape
Embroidery Thread and Needle
Pencil


Step 1: On a sheet of graph paper make an outline of what you want to stitch onto your card. Pretty simple, make sure that
its the size of your card otherwise that could
turn into a sticky situation :O

Step two: Now that you've drawn your BEAUTIFUL design, cut your graph paper to the size of the outline, or the size of the
card, whichever comes first! 
Make sure the good side of your paper is face-up so you don’t end up with a mirrored image!

Step number tres (3) : Line up your paper with your card and tape it down. Then using the needle poke 
a lotta lotta lotta holes, maybe one ever milimeter, along the lines of your design. Your 
card should have holes that look something like this!
Step four: Remove your design and inspect your holes, fill in any that look like there aren't enough
Keep your picture for reference on what you want it to look like
Start embroidering!
Step five five five five five (I wrote that five times, ya get it :P) 
Explore different techniques, add some fun filler designs, get super duper creative!!
You can tape the ends and beginnings of the threads on the back
Just makes it easier!
Once you finish your design, write a cute little message to the person who's getting this MAGNIFICENT card (:
Your finished! Now, to hide all the thread, tape a blank index card to the back of the design and BOOM, your finished
You should be so proud, you finished a beautiful card that any
one you give it to is sure to love!